
Operating an HVAC system can be very dangerous and you must have a very good understanding of what you are doing before you decide to experiment with this project. This is an experimental technology whose goal is to show you how energy can be conserved using an advanced new paradigm. Not all aspects of this project have yet been thoroughly tested and therefore, it is very unwise to operate this project unattended without expert supervision. Please refer and thoroughly understand the legal notices and disclaimers before you attempt to experiment with any aspect of this project.
Thermocloud comprises of a hardware component and software components.
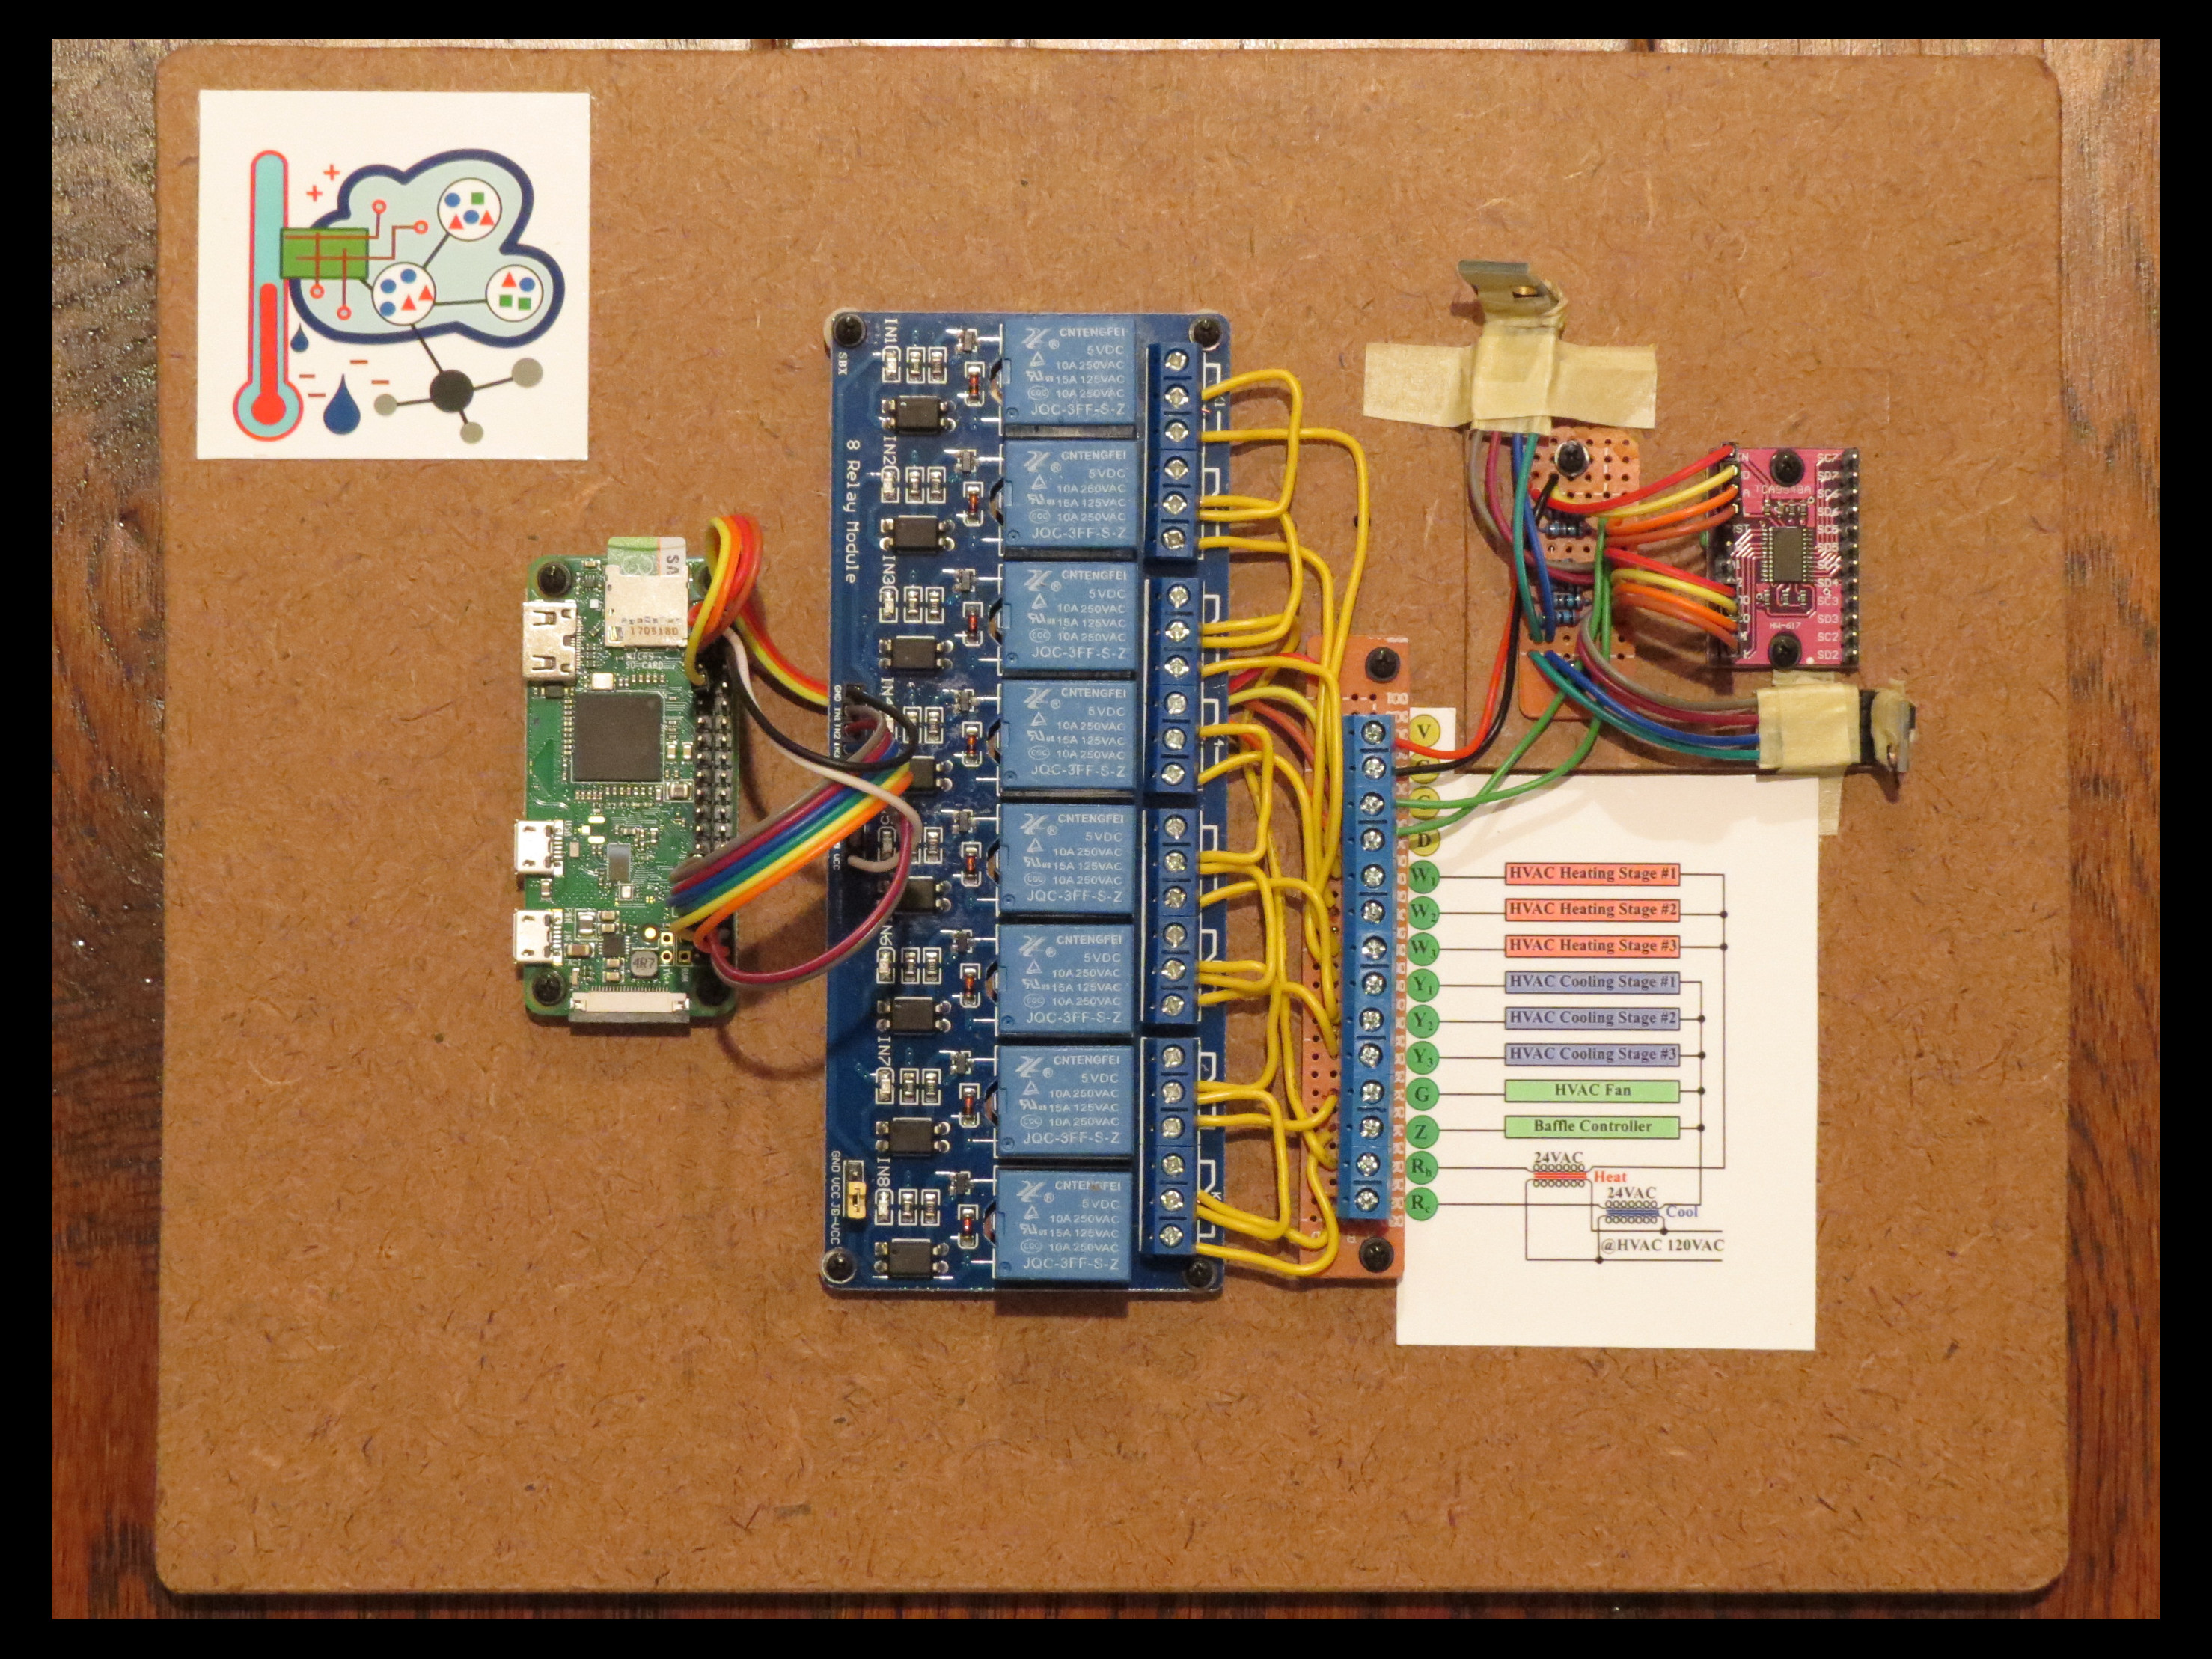
The hardware component comprises one or more zone hardware module under the control of a Raspberry Pi controller. Most recent Pi models should operate well and the zone hardware module was successfully operated using the following models of Raspberry Pi. Please inform us if you are able to also use other models of Pi.
The zone hardware module uses a readily available optocoupled relay interface board with active low-level control. The Raspberry PI and the associated control circuitry requires a 5V power supply similar to the one used for many Android devices. The zone hardware module must be wired according to the zone hardware's as described in wiring a zone.
Thermocloud can use one of your old Android devices as the client. Thermocloud client is the local component that resides in your house and serves as your primary thermostat device. The client device is expected to be permanently powered on and must remain in your house.
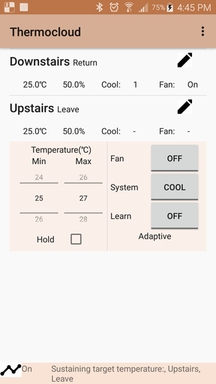
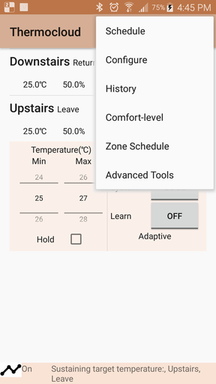
The above screenshots show the Thermocloud client's main screen and the top-application menu that enables a user to interact with the thermostat to perform the actions that are descibed in the subsequent sections below.
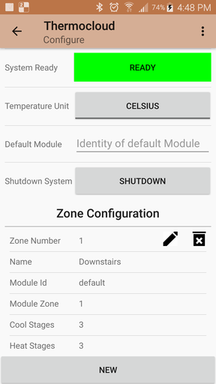
Thermocloud client requires the local system to be first configured properly before it can start operating. The client can control one or more zones in the house. Once the system is configured properly, the System Ready status shows Ready signifying that the system is now operational.
By default, the system manages temperature in Fahrenheit. Toggle it to degree Celsius here if you expect the system to manage temperature in Celsius.
The shutdown button allows the thermostat to turn off any accessible zones and gracefully turn off the thermostat client. Note that the HVAC systems will still remain powered on - only they won't be heating or cooling.
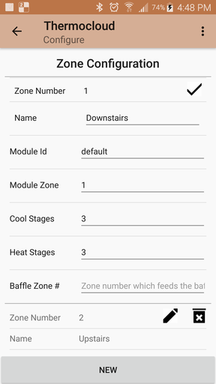
First add a zone for each HVAC system that must be controlled by this thermostat. This is done by pressing the New button at bottom of the screen. This launches Zone configuration where information for this zone can be provided.
Repeat the above process for each zone present in the house. Zones may be edited at any time using the edit button and deleted completely by pressing the delete button.
Thermocloud offers an elegant way to configure a daily schedule for each zone. Rather than guessing a schedule like many newer thermostats or using a rudimentary fixed time and temperature based schedule for conventional thermostats, Thermocloud takes a more deterministic approach that allows users better control over energy usage and comfort.
User can define custom daily schedules using two configurable items:
A schedule item allows user to define a set of time itervals and expected temperatures and comfort level for each time interval. Moreveor, this definition is identified by a unique name that can henceforth be used while defining the zone schedules.
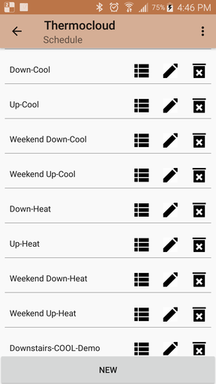
To define a new schedule item, user must select Schedule from the top application menu and then click the New button to create a new Schedule item.
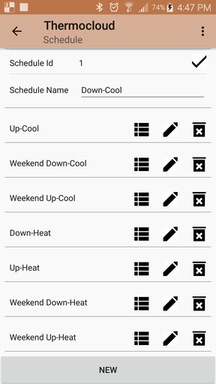
The newly created schedule represents a set of time-intervals and user's preferences for each of these intervals. This can be defined by clicking the interval-set button for the newly created schedule. This opens up the Schedule Intervals screen where user can define time intervals and their associated preferences as follows:
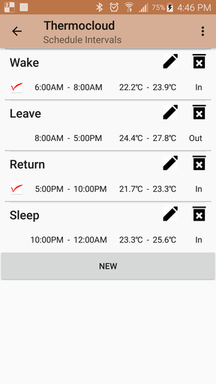
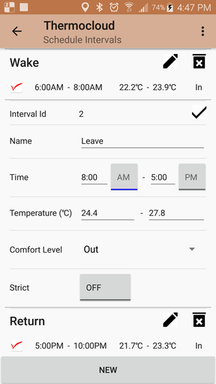
To define a new schedule interval, click the New button and fill up the following for the new interval:
By doing so, in future, user may change the value associated with this name and globally cause the comfort level change across each schedule that uses this comfort level. E.g. The label In represents when user is mostly inside the house and user seek 80% comfort (meaning temperature fluctuation of less than 20% is expected). During very hot summer months, if user wants more energy savings, comfort level In can be changed to 60% and all schedules like this that use comfort level In will now operate at 60% comfort level instead of 80% comfort level.
This item defines daily schedule for a zone by assigning a schedule item for each day of week
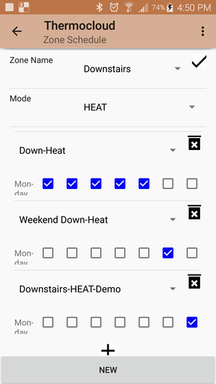

The system comes preconfigured with a default zone schedule. User may modify this by selecting Zone Schedule from the top application menu and then clicking the the edit button of the zone whose schedule must be altered.
User may add new schedule to be considered here by clicking the + button and selecting a schedule from the drop-down list of schedule names. Once selected, it may be applied to specific days by checking the checkbox for that day.
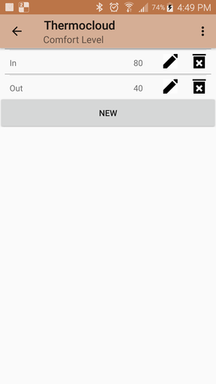
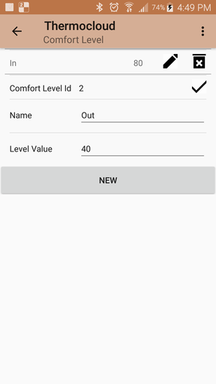
Comfort-level setting defines level of comfort that is acceptable to the user. Roughly speaking, it defines how closely you want the system to shift operating temperature to be near the most comfortable limit of the user-specified temperature range for the intervals.
If the user specified cooling temperature range 75 to 81 and user selects comfort level 100%, system strives to maintain temperature around 75 whereas if user selects comfort level 50%, the system attempts to maintain temperature between 75 to 78.
The comfort level is identified by a name and this name is used in interval specifications for each schedule. By doing so, user can change the comfort level across all schedules that use the name without specifically altering it in the interval specifications.
To create a new comfort-level, select the top-level menu option Comfort-level and click the New button.
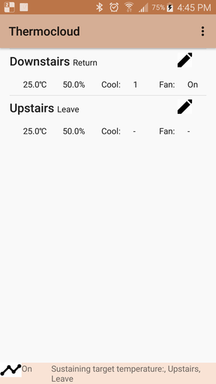
Under normal operating conditions, the main screen of the Thermocloud client application shows a dashboard of the all active zones in the system and the status of each zone as shown in the above figures and described below:
It is possible for a user to override some of the current settings directly on this screen. Press the edit button to open the operational menu for the zone comprising:
The system continuously reports actions that it takes as status messages. These messages appear as status messages at bottom of the main application screen. If the application is not active, these messages appear as notifications and can be retrieved in the main application. Furthermore, the history menu item in the top application menu also provides a list of all recent notification.
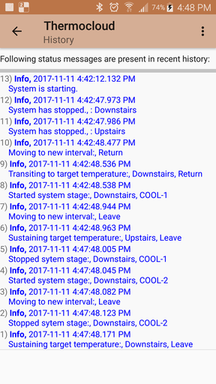
The operational history of the thermostat can be accessed using the History item in the top application menu. Each critical action performed by the thermostat is logged here along with the information level, timestamp and a brief message explaining the action taken by the thermostat along with any additional information that explains the reasoning behind this action.
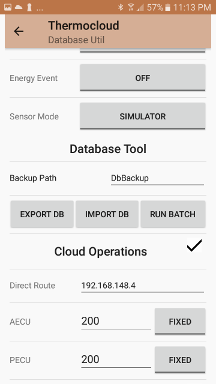
Collaboration can be activated using the top application menu's Advanced Tools item and going to the Cloud Operations section of this configuration as shown above.
Turn off collaboration: Setting this field as empty (followed by restarting the thermostat device) ensures that this thermostat will operate in standalone mode without collaborating with the cloud.


